Dead Rising PC - The Complete ArcTool (v1.2)
Apr 27, 2020 22:28:13 GMT -5
killmymiss, Mel, and 9 more like this
Post by grimdoomer on Apr 27, 2020 22:28:13 GMT -5
Update for ArcTool, this version includes a UI overhaul, mod management system, and a bunch of features for adding/copy/pasting/renaming/deleting/and duplicating files.
Current features:
- Extraction/Injection of files
- Add/Delete/Rename files
- Ability to create patch files that override original game files
- Textures: Extract/Inject/Preview, all texture formats for PC fully supported
- 3D Models: Can view models and level geometry for PC, some animations are playable
- Text files: Full editing capabilities
The tool supports both PC and Xbox files, though it is primarily designed for PC with support for Xbox being 1 release behind any features added for PC.
Download & Source Code
Download: DeadRisingArcTool v1.2
Source code: Github
How To Use
Start by opening the game folder, ArcTool will scan this folder and all child folders for arc files. Once you select your game folder for the first time, ArcTool will remember this location and auto select it the next time you go to Open.
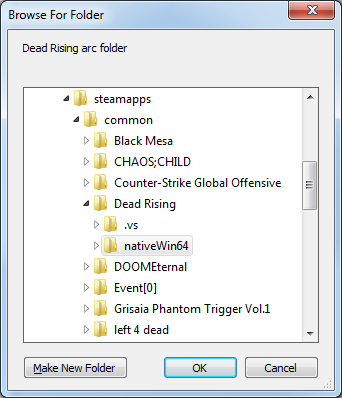

After you open your game files for the first time ArcTool will remember this location and it will be auto selected the next time you click File->Open.
Once the folder has been selected you will be prompted to select which archives to load, any patch archives will be displayed at the top of the list and in blue while the original game archives will be displayed in black. You can select any combination of archives here, but it is recommended to load all the original game archives, and only the patch archives that you want to edit.
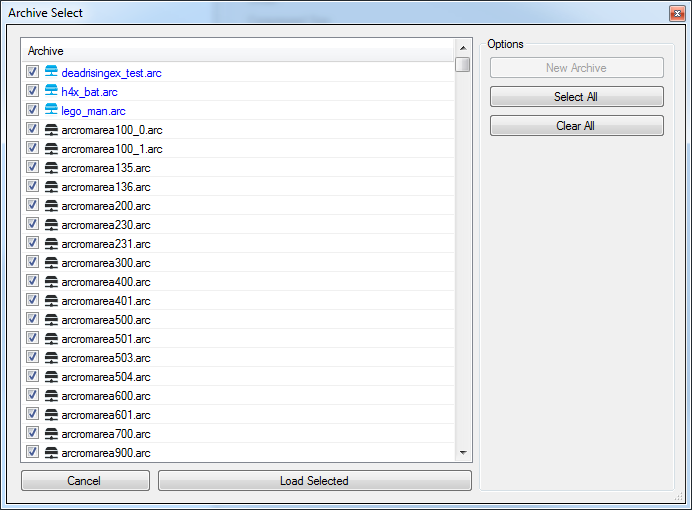
Basic Navigation
After opening the archives ArcTool will display a collective list of all files found inside of them. You can change the sort order by right clicking the file list and selecting one of the "Sort By" options. Currently you can sort by file name, arc file, and file type.
Files will be displayed in one of two folders, the "Game Files" folder and the "Mods" folder. All the files in the game files folder are the original game files, these files are not meant to be edited and all options for modifying them will be disabled. The files in the mods folder are patch files that override the original game files. These files are meant to be modified and all editing options will be enabled for them. The process for overriding a game file is explained below.
Files displayed in red mean that ArcTool cannot edit it, you can extract and inject these files but you will not have any specialized editing capabilities. Files displayed in black mean ArcTool has a specialized editor for this file type, e.x.: texture viewer, model viewer, xml text editor, etc.
Files displayed in blue under the Game Files folder mean that they are being overridden by a file in the mods folder. Files displayed in blue under the Mods folder mean they are overriding an original game file.
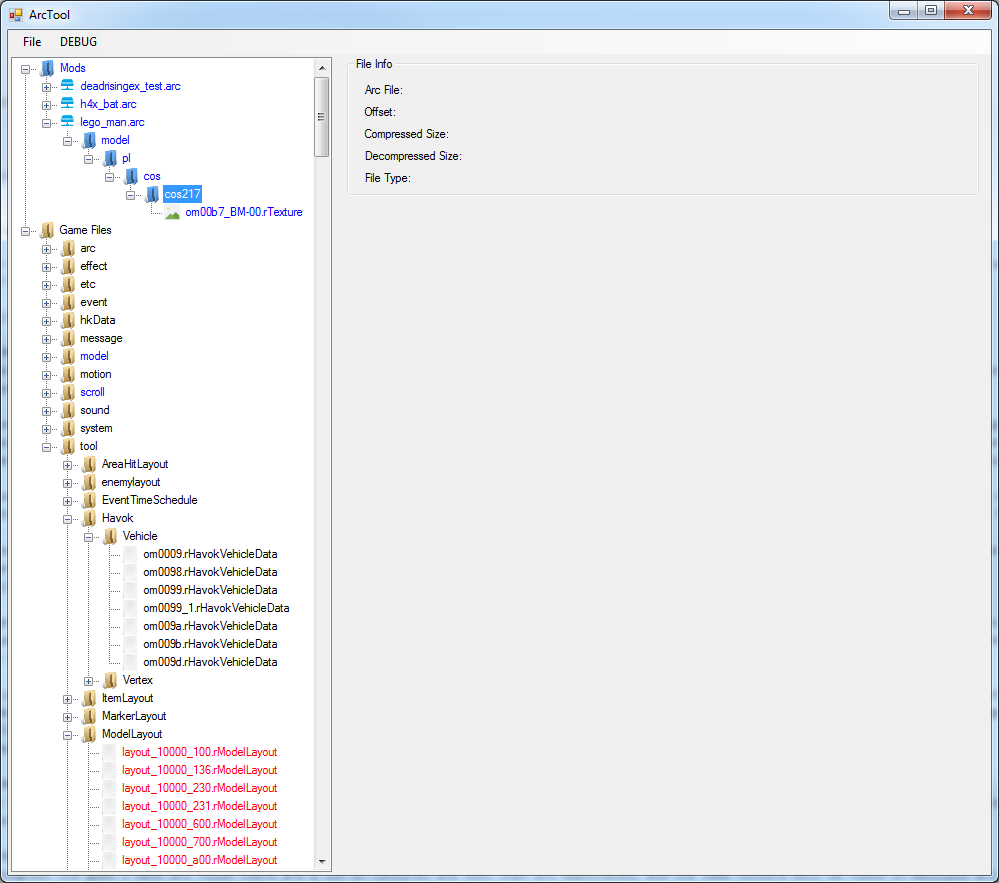

File Options
Right clicking a file or folder in the file list will give you a number of options for editing that file or folder. Some options are only enabled for patch files and some are enabled Here is a breakdown of what each option does and where you can use it:
| Option | Description | Use on |
| --- | --- | --- |
| Add | Add a file to the archive | Folders for mods |
| Extract | Extracts the selected file | Any game or mod file |
| Inject | Replaces the selected file with a new one | Files for mods |
| Copy | Copies the selected folder or file to the clipboard | Any file or folder |
| Copy To Archive | Copies the selected folder or file to an archive | Any file or folder |
| Paste | Pastes the clipboard contents into the folder selected | Any mod folder |
| Duplicate | Creates a duplicate of the selected file | Any mod file |
| Rename | Renames the selected file | Any mod file |
| Delete | Deletes the selected file or folder | Any mod file or folder |
| Sort By | Changes how the files in the file view are sorted | Anywhere |
| Render | Renders all of the rModel files in the selected folder in one view | Any folder with rModel files |
Copying Files
Copying files to a patch archive can be done a couple different ways. If you want to create a new patch archive from the selected file or folder you can use the "Copy To Archive" button which will let you select an existing patch archive or create a new one.
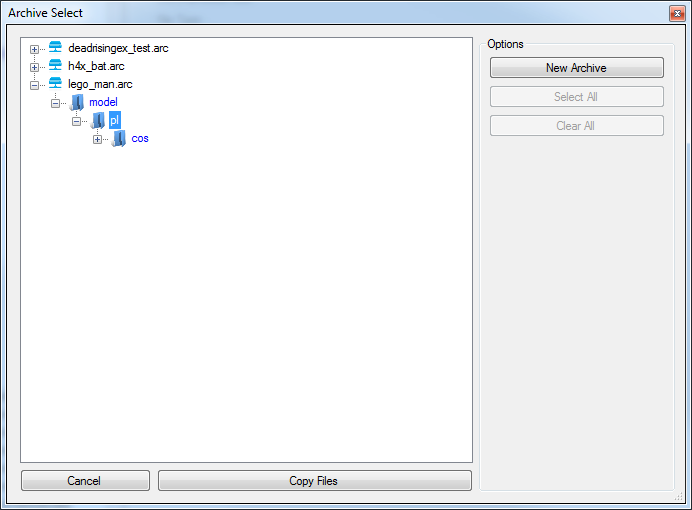
Copying files to a patch archive can be done a couple different ways. If you want to create a new patch archive from the selected file or folder you can use the "Copy To Archive" button which will let you select an existing patch archive or create a new one.

If you have a patch archive already created you can use the Copy/Paste options or Ctrl+C/Ctr+V or the Copy To Archive option to copy files or folders. You can copy any file or folder whether it is from the Game Files folder or Mods folder, but you will only be able to paste them into a patch archive.
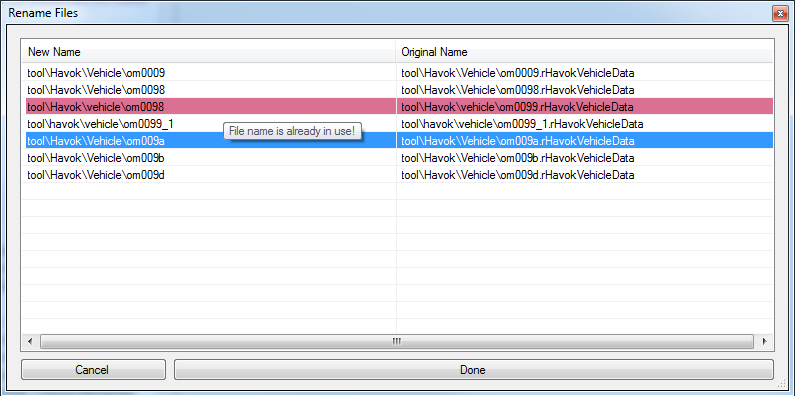
Pasting a file or folder will show the rename dialog and allow you to rename all of the files before adding them to the patch archive. Clicking a file name twice will allow you to edit the file name and folder path for that item. If you rename a file and the file name already exists or the file name is invalid it will be displayed in red, and you will be asked to choose a new file name. Hovering over the item will give a description of why the file name is invalid.
Extraction/Injection
Right clicking on a file entry will allow you to extract and inject the file. This will read/write the file using the game's proprietary format e.x.: rtexture, rmodel, etc. If the file type has a specialized editor you may have additional extraction/injection options that are more robust. For example, the texture editor will let you extract and inject textures in .dds format.
If you want to extract and inject files in the game's proprietary format use the Extract/Inject options from the file list. If you want to extract and inject files in a more usable format (.dds, .txt, .obj, etc.) use the Extract/Inject options that are part of the specialized editors. You cannot mix the two together.
- File list -> .rtexture, .rmodel, etc.
- Specialized editor -> .dds, .txt, .obj, etc.
Patch Archives (Patch Files)
ArcTool lets you create a patch file which is an archive that contains all of your mods for the original game files. Using these patch files along with the DeadRisingEx game patch you can easily put all of your mods into a single archive that overrides the original game files. Using this you can easily distribute your mods without having to re-upload the original game files, and even allows you to load multiple mods at the same time, and specify the order they should be loaded in. If you have ever played Skyrim or Fallout with mods, this system works very similarly to that. Patch files will NOT be loaded by the game unless the DeadRisingEx game patch is installed. For more information on how to install and use the DeadRisingEx game patch, see: URL
You can create a patch file by right clicking on a folder or file under the Game Files folder and selecting "Copy To Archive". When the archive select dialog appears you can use the New Archive option to create a new patch archive. All patch archives should be saved under "nativeWin64\Mods" in the game's directory. If you already installed the DeadRisingEx game patch then the save file dialog will set this as the default path when opening.
Patch archives can contain files that override the original game files as well as ones that do not. In order for a file in a patch archive to override an original game file, it must have the same file name and be located in the same folder path as the original game file. For example if I want to override "model\pl\cos\cos217\om00b7_BM-00.rTexture", I would copy the file to a patch archive using the same folder path and file name: "model\pl\cos\cos217\om00b7_BM-00.rTexture". Any files that are overridden will be colored in blue to distinguish them from files that do not override an original game file.
Overriding an original game file will override all copies of that file. So if you override a texture that is used in different parts of map it will override ALL places it is used.
If you click on any rtexture files the texture editor will display a preview of the image with some additional info, and let you view the different mip map levels for that texture. Right clicking the preview will let you extract/inject the texture in .dds format. If the image has multiple mip maps they will all be extracted into one file. Additionally you can drag-n-drop .dds files onto the preview image and it will automatically inject the file for you.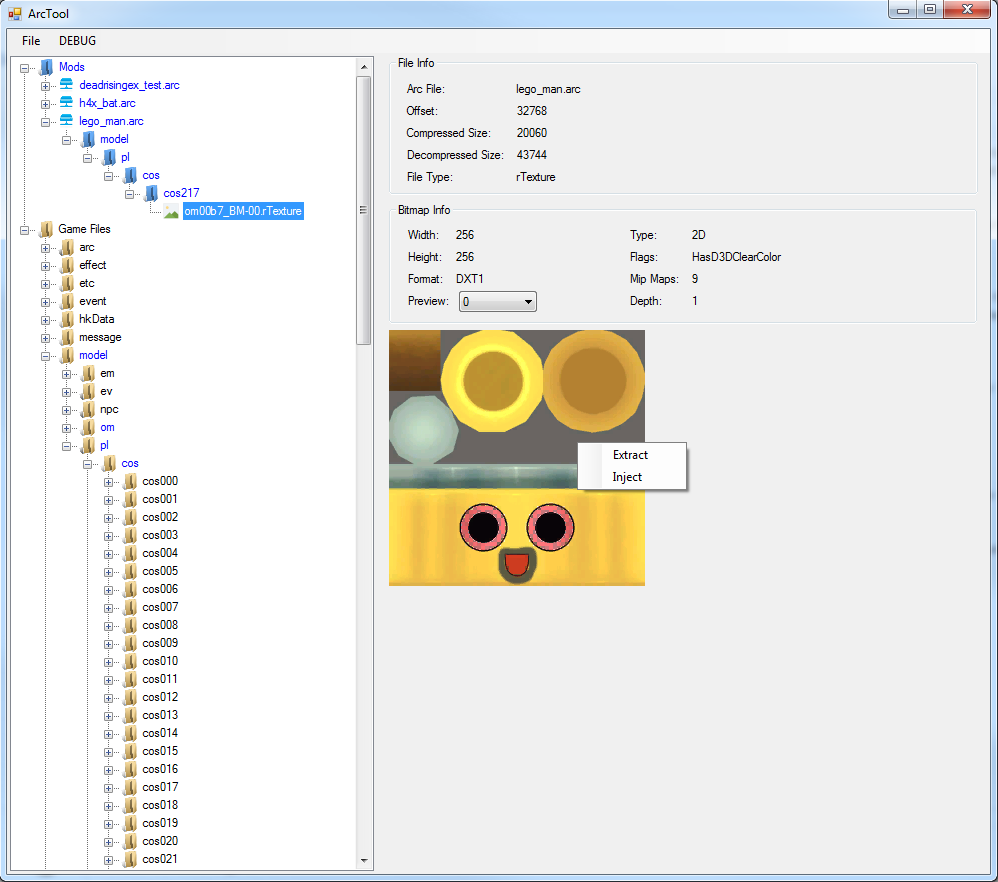
The following file types can be modified in the text editor:
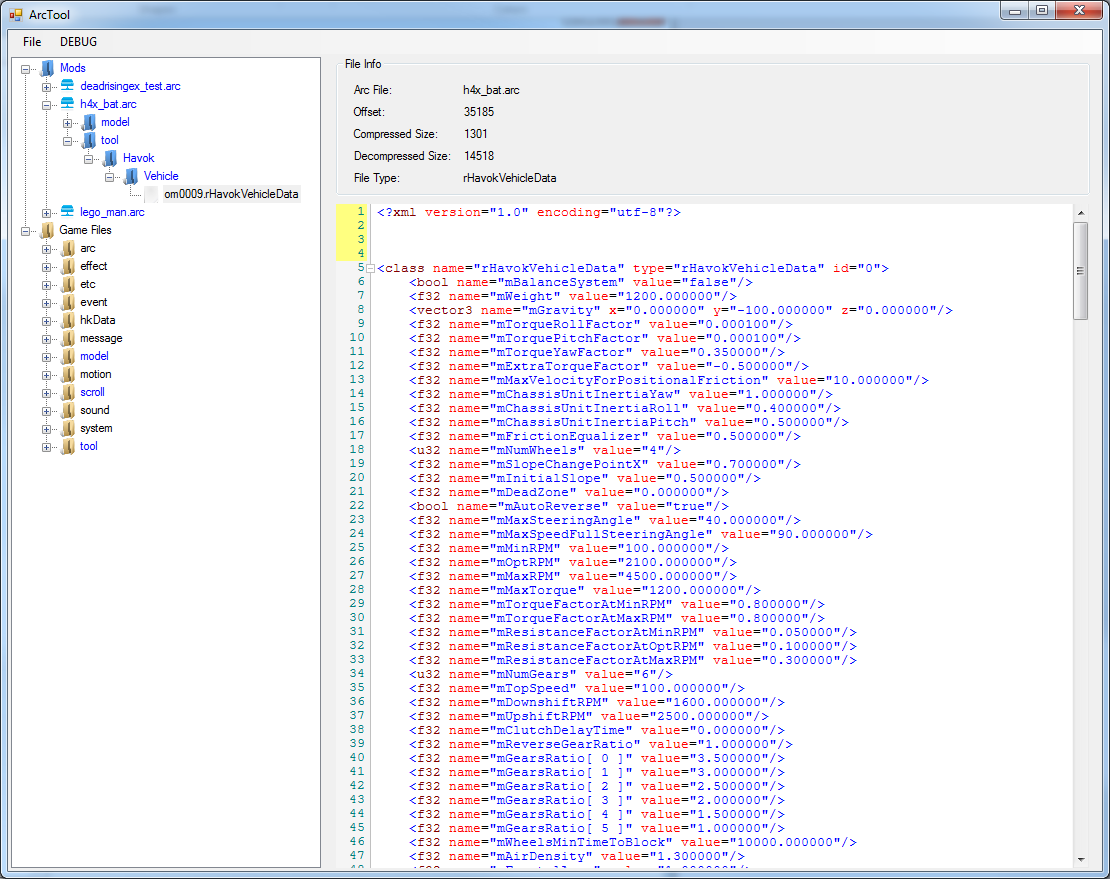
If you make changes to the file the lines changed will have a yellow indicator by the line number. The text editor supports a bunch of hotkeys, the most notable ones are:
If you make changes to a file and then try to select a new file without saving, you will be prompted to save or discard your changes.
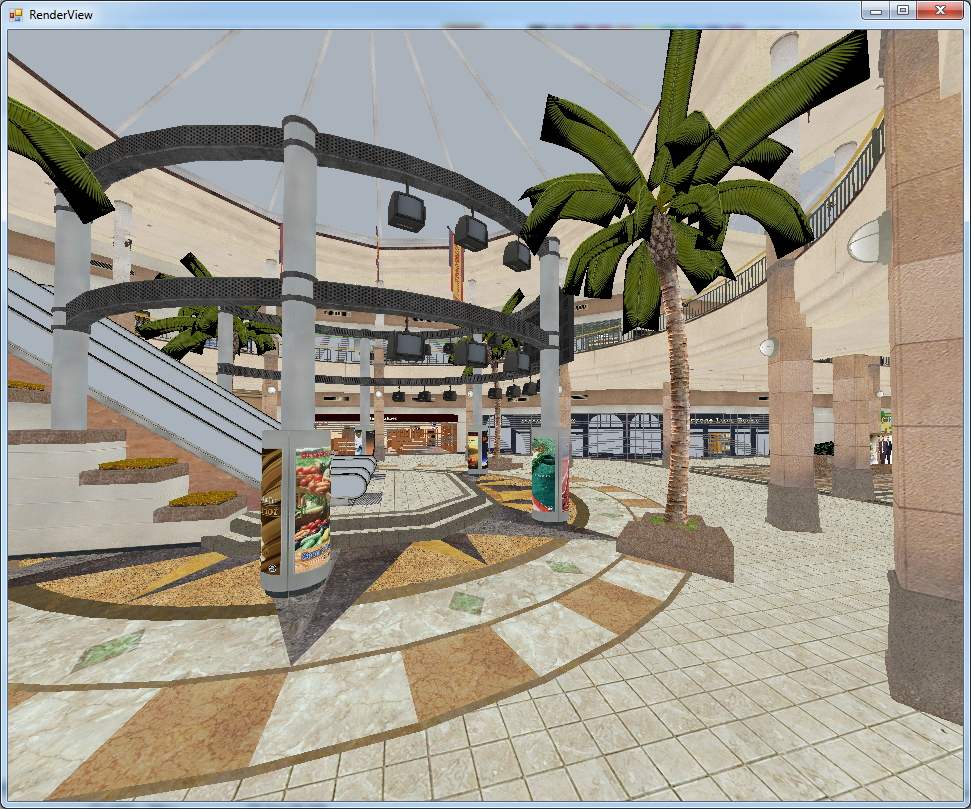
The model editor can view any game model and most of the level geometry for the different levels. After clicking on a rmodel file, the model editor will display some information about the model: textures, joints, materials, primitives, etc. Clicking the Render button will open the render view and display the model with a flycam.
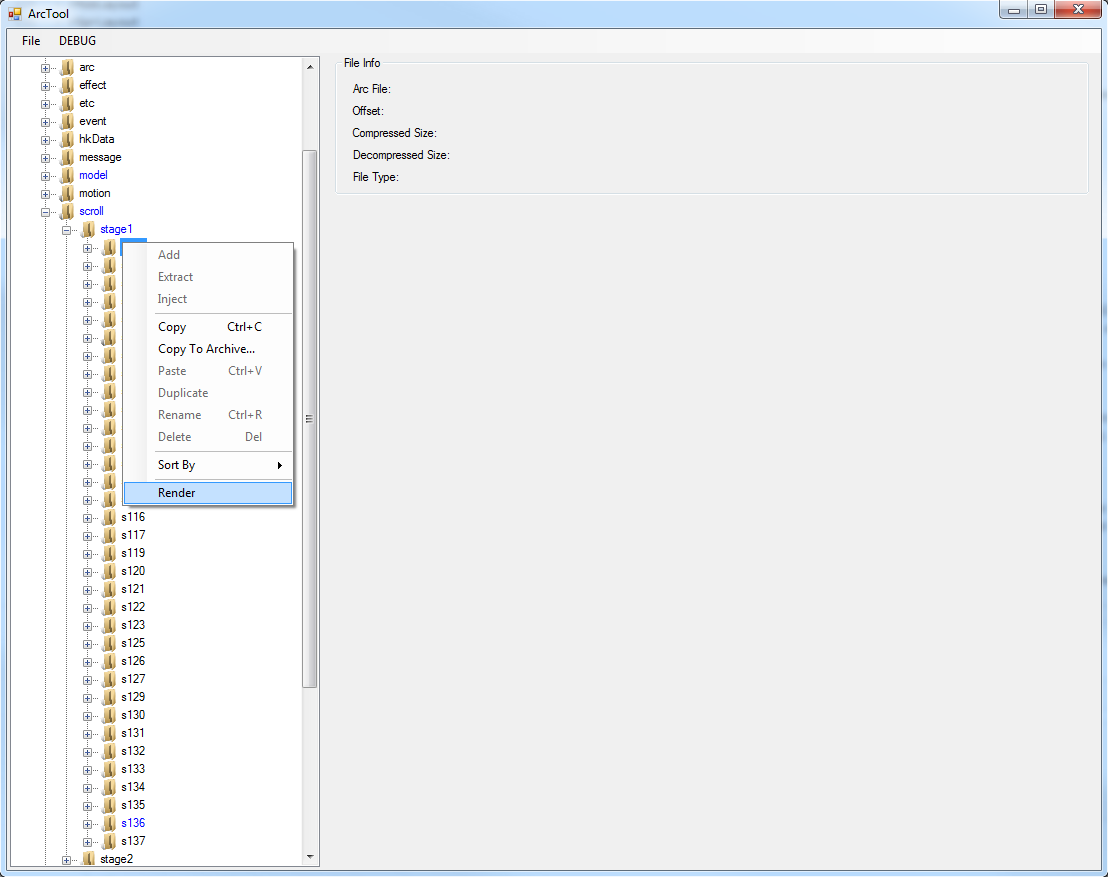
Rendering level geometry is done by selecting the folder for the level models you want to render, right clicking, and selecting the "Render" option in the file list. This will search the current folder and all subfolders for rmodel files and render all of them in one window.
This is typically used for the \scroll\stageN\sXXX folders, you can also use it for the higher up \scroll\stageN folders as well. The more models it tries to render the longer the render view will take to load. Some level sections will have missing bits of geometry here and there because the render viewer is still a WIP and is missing functionality for more advanced features. This will be worked out in a future releases.
When the render viewer opens it will try to position you near the model with it in sight, and adjust the movement speed of the camera to suit the size of the model. This is all guess work though, so sometimes it will be completely off and you will spawn without the model in front of you. You may need to pan around until you find it.
The model viewer also supports using a gamepad such as an Xbox controller for flycam controls. I believe a PS4 controller will work as well but have not tested this myself.
| Keyboard/Mouse | Gamepad | Function |
| --- | --- | --- |
| W/S/A/D | Left Thumbstick | Camera movement |
| Z/X | L/R Thumbstick Press | Move camera up or down |
| +/- | L/R Trigger | Change camera movement speed |
| Left mouse hold and click | Right Thumbstick | Aim the camera |
| Page Up/Down | Right/Left Bumper | Play next/previous animation |
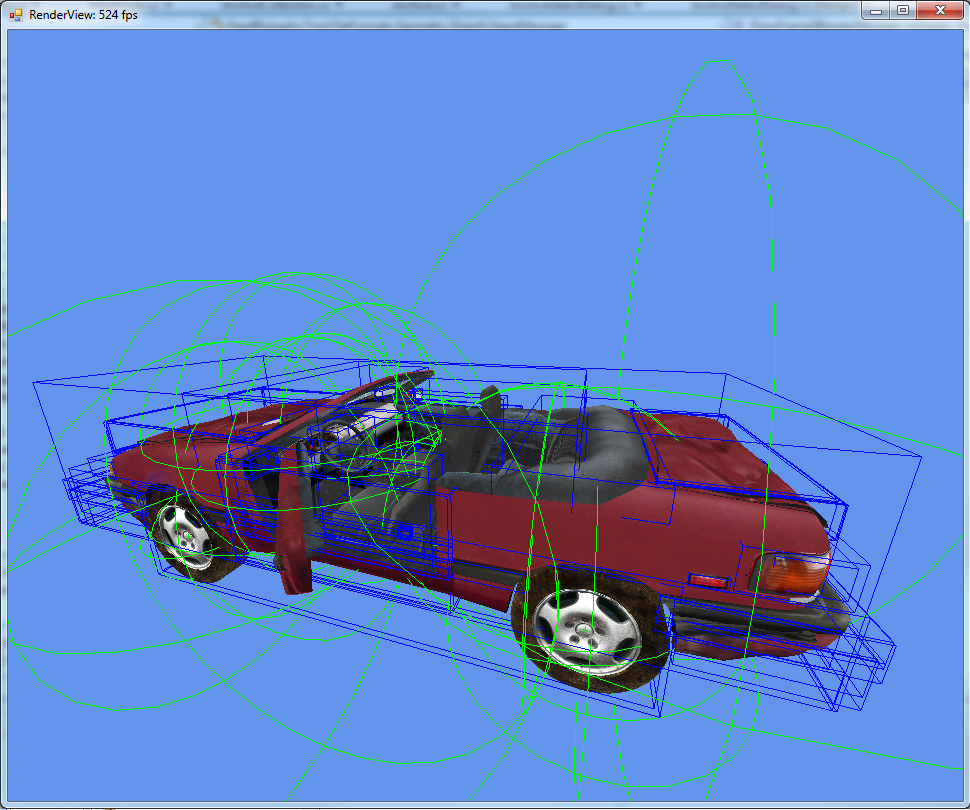
| 1 | X | Draw bounding spheres for bone markers |
| 2 | Y | Draw bounding boxes for mesh sections |
Animation support is still very primitive and should be considered experimental. The model viewer will only play an animation for a model if it has the same folder path and file name but is located in the motion folder instead of the model folder. If the animation file is located elsewhere the model viewer will not currently find it.
Toggling the bounding spheres and boxes using a controller can be a little finicky, this is a known issue and will be fixed in the next version.
ArcTool lets you create a patch file which is an archive that contains all of your mods for the original game files. Using these patch files along with the DeadRisingEx game patch you can easily put all of your mods into a single archive that overrides the original game files. Using this you can easily distribute your mods without having to re-upload the original game files, and even allows you to load multiple mods at the same time, and specify the order they should be loaded in. If you have ever played Skyrim or Fallout with mods, this system works very similarly to that. Patch files will NOT be loaded by the game unless the DeadRisingEx game patch is installed. For more information on how to install and use the DeadRisingEx game patch, see: URL
You can create a patch file by right clicking on a folder or file under the Game Files folder and selecting "Copy To Archive". When the archive select dialog appears you can use the New Archive option to create a new patch archive. All patch archives should be saved under "nativeWin64\Mods" in the game's directory. If you already installed the DeadRisingEx game patch then the save file dialog will set this as the default path when opening.
Patch archives can contain files that override the original game files as well as ones that do not. In order for a file in a patch archive to override an original game file, it must have the same file name and be located in the same folder path as the original game file. For example if I want to override "model\pl\cos\cos217\om00b7_BM-00.rTexture", I would copy the file to a patch archive using the same folder path and file name: "model\pl\cos\cos217\om00b7_BM-00.rTexture". Any files that are overridden will be colored in blue to distinguish them from files that do not override an original game file.
Overriding an original game file will override all copies of that file. So if you override a texture that is used in different parts of map it will override ALL places it is used.
Texture Editor
If you click on any rtexture files the texture editor will display a preview of the image with some additional info, and let you view the different mip map levels for that texture. Right clicking the preview will let you extract/inject the texture in .dds format. If the image has multiple mip maps they will all be extracted into one file. Additionally you can drag-n-drop .dds files onto the preview image and it will automatically inject the file for you.

Currently all PC texture formats are supported, xbox has partial viewing support but the images are not untiled and appear a bit scrambled, this is something that will be functional in the next release. Due to discrepancies in how different image editors handle dds files, you may have issues opening dds images saved from ArcTool, as well as issues injecting dds images saved with certain image editors. Here is a compatibility list:
If you have issues opening or injecting files with a certain image editor, open a github issue with the name of the game file you were trying to modify and the image editor you were using, and I will try to add support for it. When injecting a a texture ArcTool will update the game file to match the new width, height, format, type, and mip map count. Though unless you know what you are doing you should match the format the texture was originally in.
- DirectX Texture Tool - Full support
- Paint .Net - Full viewing support, cannot save U8V8 bumpmaps
- Photoshop - Should work fine, need to confirm U8V8 support
If you have issues opening or injecting files with a certain image editor, open a github issue with the name of the game file you were trying to modify and the image editor you were using, and I will try to add support for it. When injecting a a texture ArcTool will update the game file to match the new width, height, format, type, and mip map count. Though unless you know what you are doing you should match the format the texture was originally in.
Text Editor
The following file types can be modified in the text editor:
- rCameraListXml
- rClothXml
- rEnemyLayoutXml
- rFSMBrainXml
- rMarkerLayoutXml
- rModelInfoXml
- rModelLayoutXml
- rNMMachineXml
- rRouteNodeXml
- rSchedulerXml
- rSoundSegXml
- rUBCellXml
- rEventTimeSchedule
- rHavokVehicleData
- rAreaHitLayout
- rHavokConstraintLayout
- rHavokLinkCollisionLayout
- rHavokVertexLayout
- rItemLayout
- rMobLayout
- rSprLayout
- rSMAdd
- rMapLink
If you make changes to the file the lines changed will have a yellow indicator by the line number. The text editor supports a bunch of hotkeys, the most notable ones are:
- Ctrl+F: Find dialog
- Ctrl+G: Goto line number
- Ctrl+Z: Undo
- Ctrl+Y: Redo
- Ctrl+S: Save changes
If you make changes to a file and then try to select a new file without saving, you will be prompted to save or discard your changes.

Model Viewer
The model editor can view any game model and most of the level geometry for the different levels. After clicking on a rmodel file, the model editor will display some information about the model: textures, joints, materials, primitives, etc. Clicking the Render button will open the render view and display the model with a flycam.
Rendering level geometry is done by selecting the folder for the level models you want to render, right clicking, and selecting the "Render" option in the file list. This will search the current folder and all subfolders for rmodel files and render all of them in one window.
This is typically used for the \scroll\stageN\sXXX folders, you can also use it for the higher up \scroll\stageN folders as well. The more models it tries to render the longer the render view will take to load. Some level sections will have missing bits of geometry here and there because the render viewer is still a WIP and is missing functionality for more advanced features. This will be worked out in a future releases.

When the render viewer opens it will try to position you near the model with it in sight, and adjust the movement speed of the camera to suit the size of the model. This is all guess work though, so sometimes it will be completely off and you will spawn without the model in front of you. You may need to pan around until you find it.
The model viewer also supports using a gamepad such as an Xbox controller for flycam controls. I believe a PS4 controller will work as well but have not tested this myself.
| Keyboard/Mouse | Gamepad | Function |
| --- | --- | --- |
| W/S/A/D | Left Thumbstick | Camera movement |
| Z/X | L/R Thumbstick Press | Move camera up or down |
| +/- | L/R Trigger | Change camera movement speed |
| Left mouse hold and click | Right Thumbstick | Aim the camera |
| Page Up/Down | Right/Left Bumper | Play next/previous animation |
| 1 | X | Draw bounding spheres for bone markers |
| 2 | Y | Draw bounding boxes for mesh sections |
Animation support is still very primitive and should be considered experimental. The model viewer will only play an animation for a model if it has the same folder path and file name but is located in the motion folder instead of the model folder. If the animation file is located elsewhere the model viewer will not currently find it.
Toggling the bounding spheres and boxes using a controller can be a little finicky, this is a known issue and will be fixed in the next version.


 And it struggles to maintain steady FPS at some points during gameplay (for example, the scene in the beginning of the game when survivors are barricading the main doors and huge amount of zombies are behind the glass). I tried changing all available Video options and also experimented with NVidia Panel options as well. Still game is not very stable.
 A nice dose of good old Dead Rising gameplay could really help me out in this point in my life, giving me some optimism from the older and simpler days